Maquillaje para Halloween 3: Muñeca Rota / Halloween Makeup 3: Broken Doll
6 comments
.jpeg)
Este post es bilingüe / This post is bilingual
Ya falta muy poco para la noche más terrorífica del año, pero... Estos pocos días todavía nos dan la oportunidad de continuar disfrutando de muchos maquillajes...
¿Alguien sabe coser? Porque definitivamente esta muñeca necesita una buena costura... Y más relleno.
The scariest night of the year is just a few days away, but... These few days still give us the opportunity to continue enjoying many makeovers...
Does anyone know how to sew? Because this doll definitely needs a good sewing.... And more stuffing.
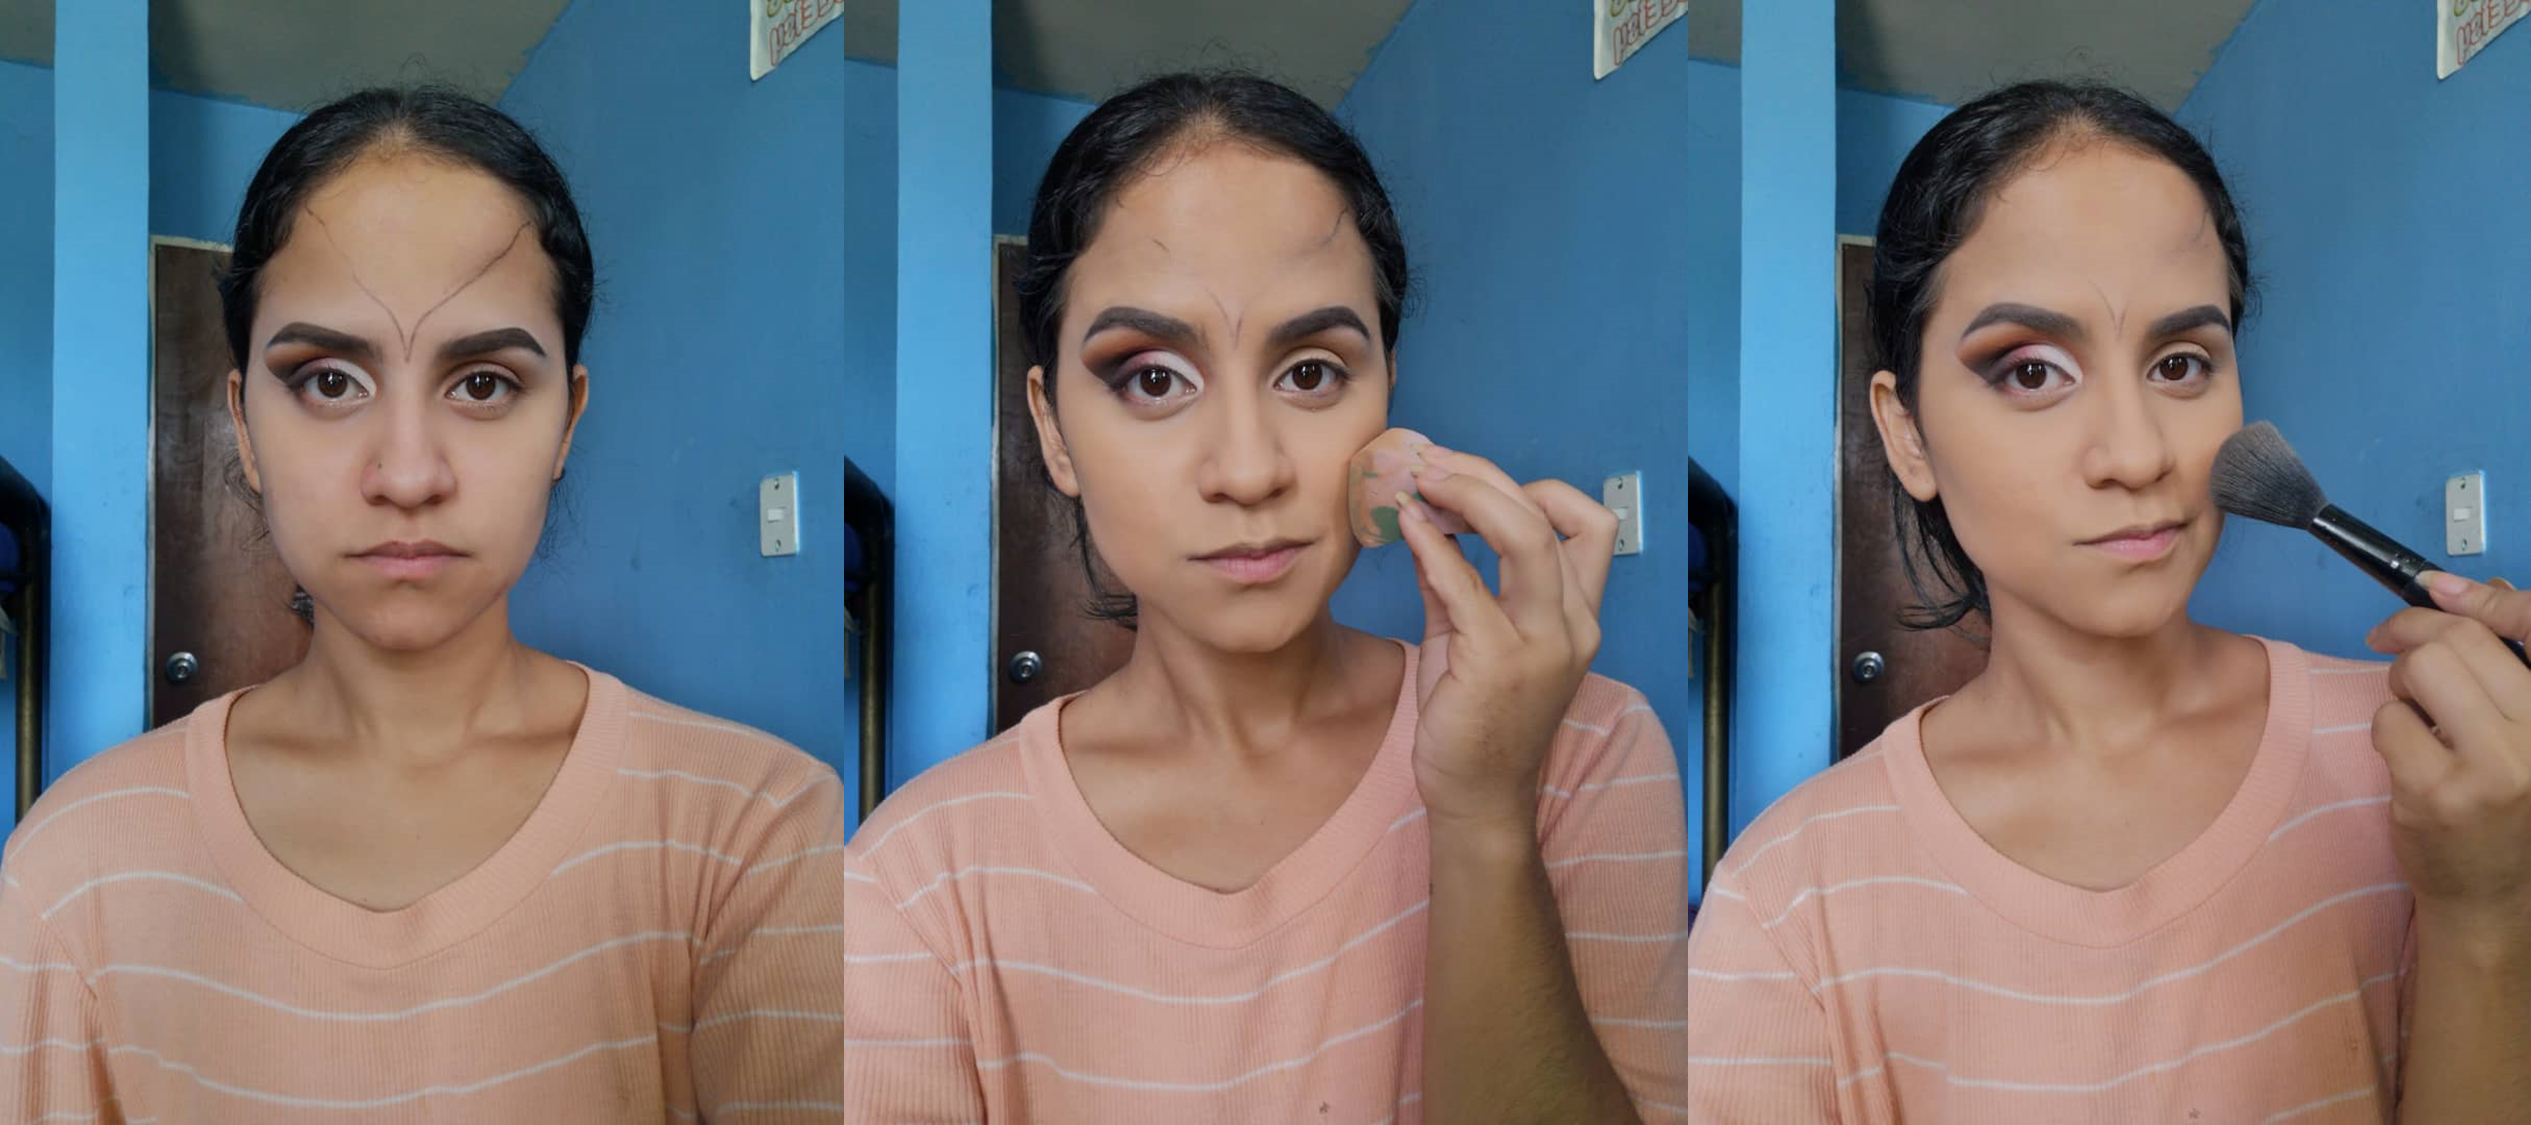
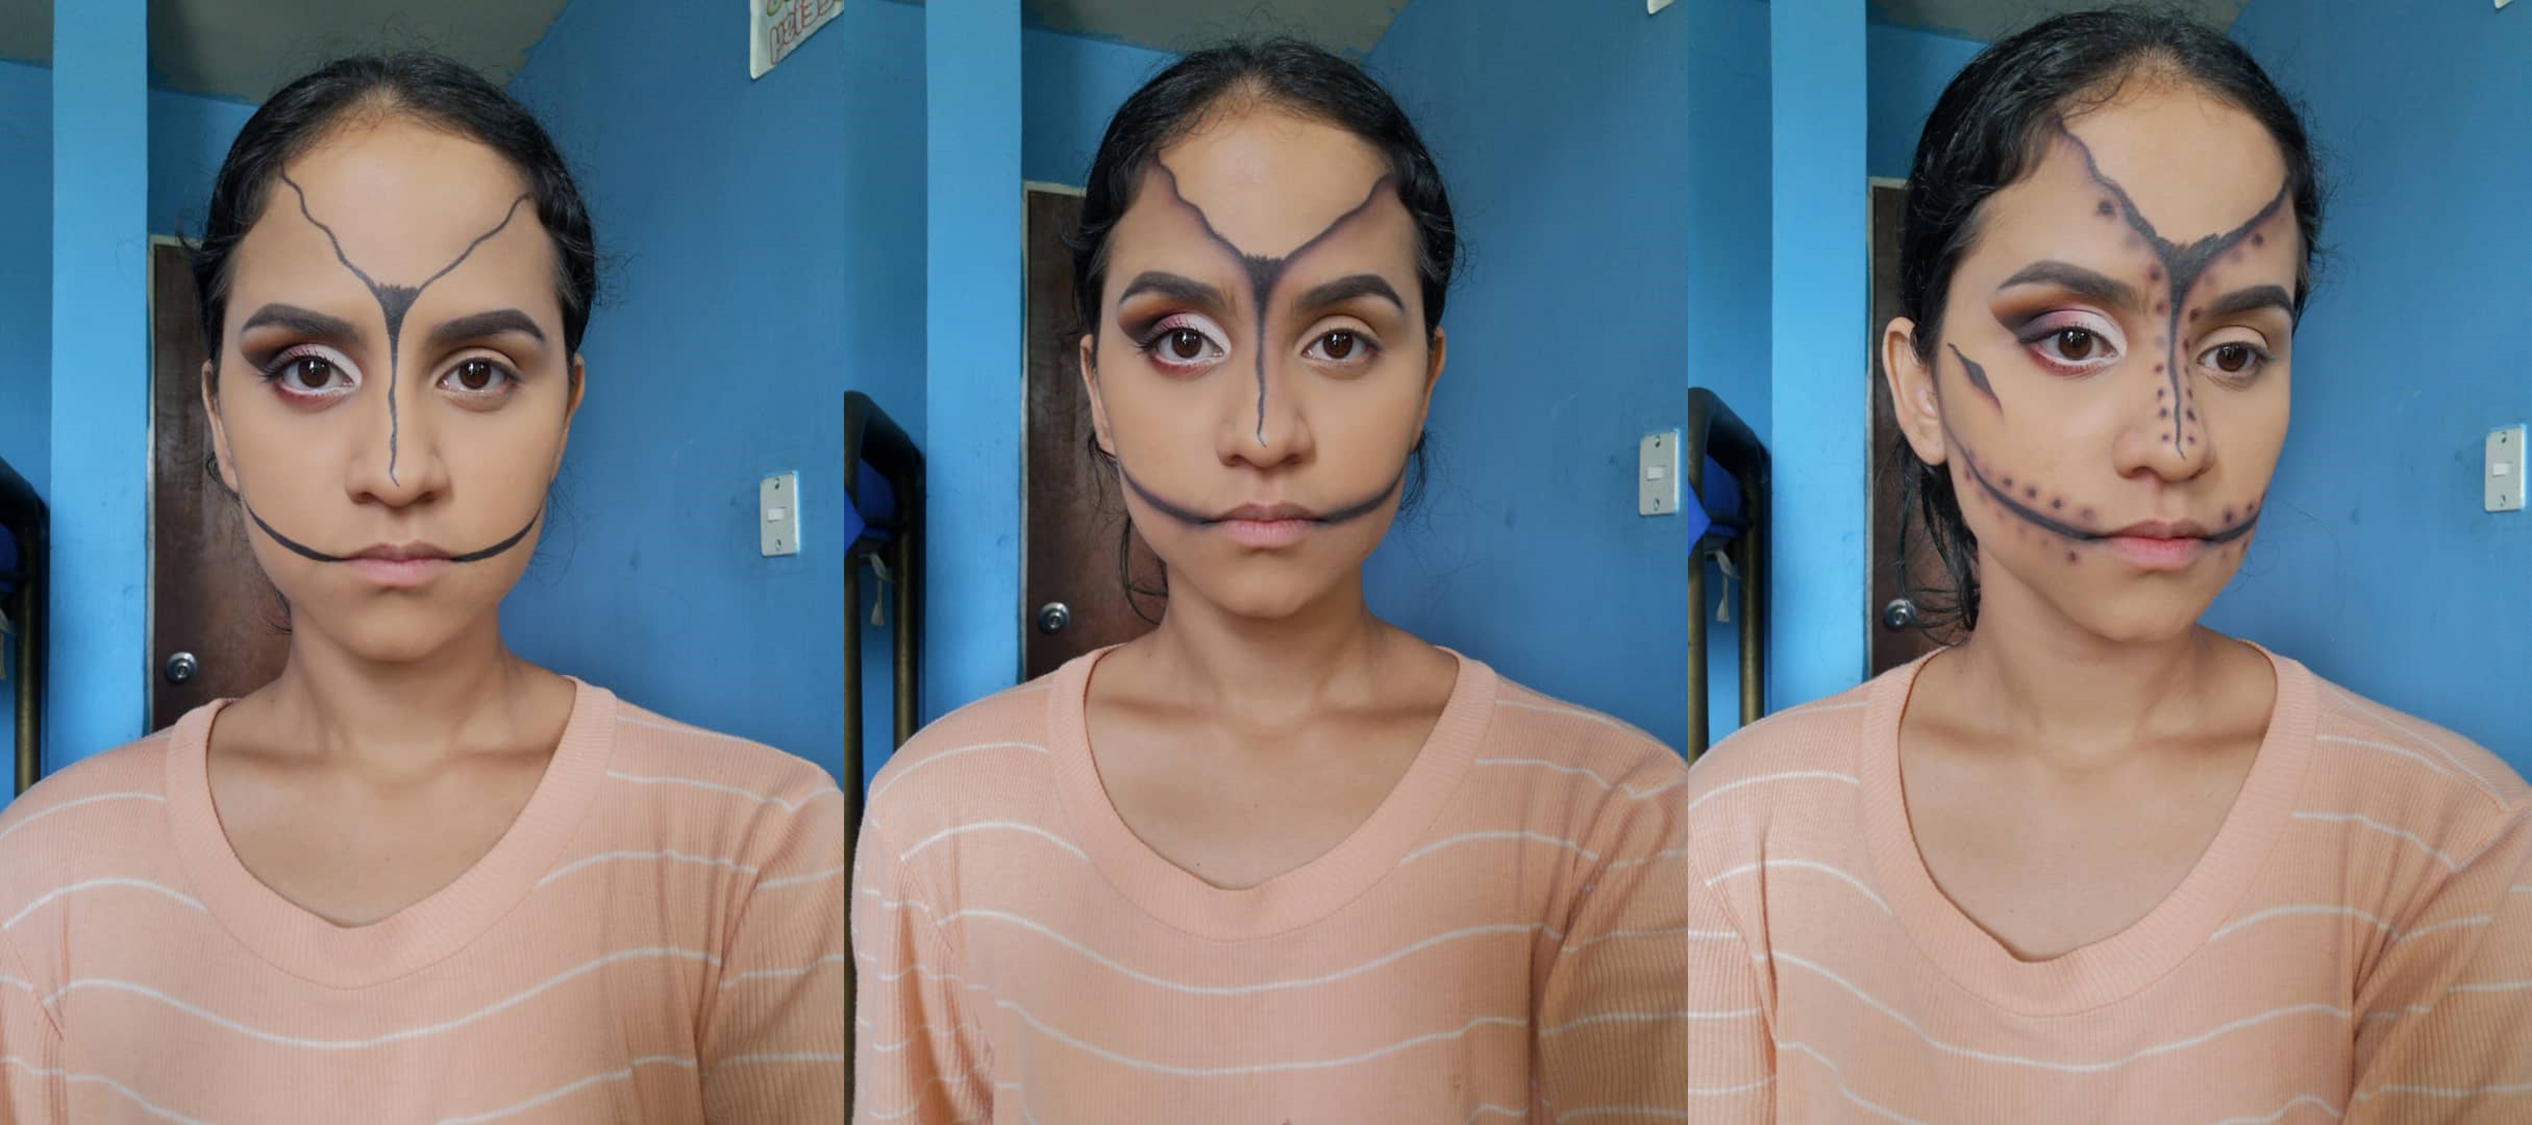
Para comenzar con este maquillaje, lo primero que hice fue mis cejas, las hice como normalmente las hago, utilizanco un lápiz para darles forma y poco de corrector para definir.
To start with this makeup, the first thing I did was my eyebrows, I did them as I normally do, I used a pencil to shape them and some concealer to define them.
Como se pudieron dar cuenta en la imagen principal, el ojos izquierdo no se va a ver, así que lo vamos a dejar libre y nos vamos a concentrar en el ojo derecho.
Para dejar listo el corte de las sombras, coloqué primero un poco de cinta adhesiva en la zona externa del ojo de forma diagonal y apliqué corrector en todo el párpado.
Luego, apliqué una sombra anaranjada en la zona de la cuenca y con una blanca realicé un semi cut crease. Con una sombra roja difuminé la línea del cut crease y terminé dando profundidad con un marrón oscuro.
As you could see in the main image, the left eye is not going to be seen, so we are going to leave it free and concentrate on the right eye.
To get the shadows cut ready, I first placed some masking tape on the outer eye area diagonally and applied concealer all over the eyelid.
Then, I applied an orange shadow in the eye socket area and with a white shadow I made a semi cut crease. With a red shadow I blurred the line of the cut crease and finished by giving depth with a dark brown.

Para preparar el rostro, primero hice un triángulo invertido en la zona de la frente, no lo hice completamente recto, solo queria dejar el espacio para colocar lo que sería el relleno de la muñeca.
Luego, pasé al rostro, donde apliqué base, corrector y polvo compacto.
To prepare the face, I first made an inverted triangle on the forehead area, I didn't make it completely straight, I just wanted to leave the space to place what would be the filler of the wrist.
Then, I moved on to the face, where I applied foundation, concealer and pressed powder.
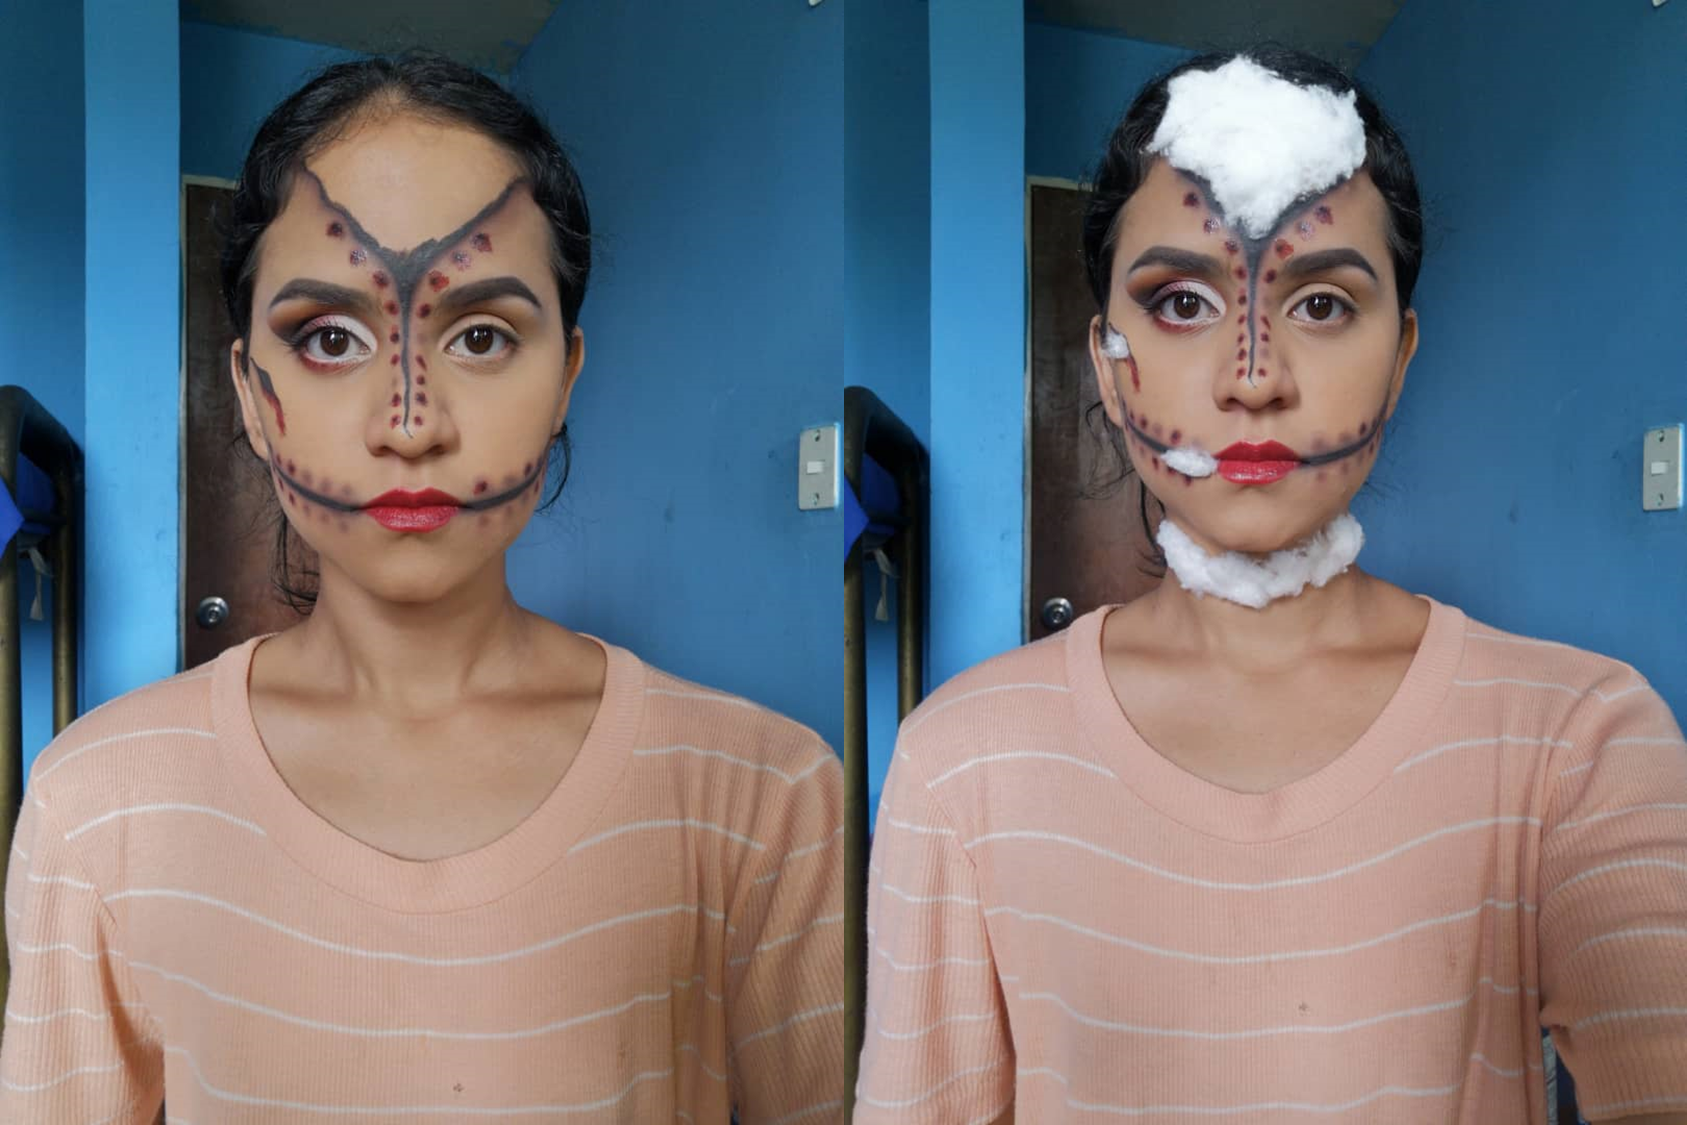
Para terminar el ojo, apliqué un lápiz blanco en la línea de agua inferior, una sombra rojaen el párpado inferior y máscara de pestaña negra.
To finish the eye, I applied a white pencil on the lower waterline, a red shadow on the lower eyelid and black mascara.
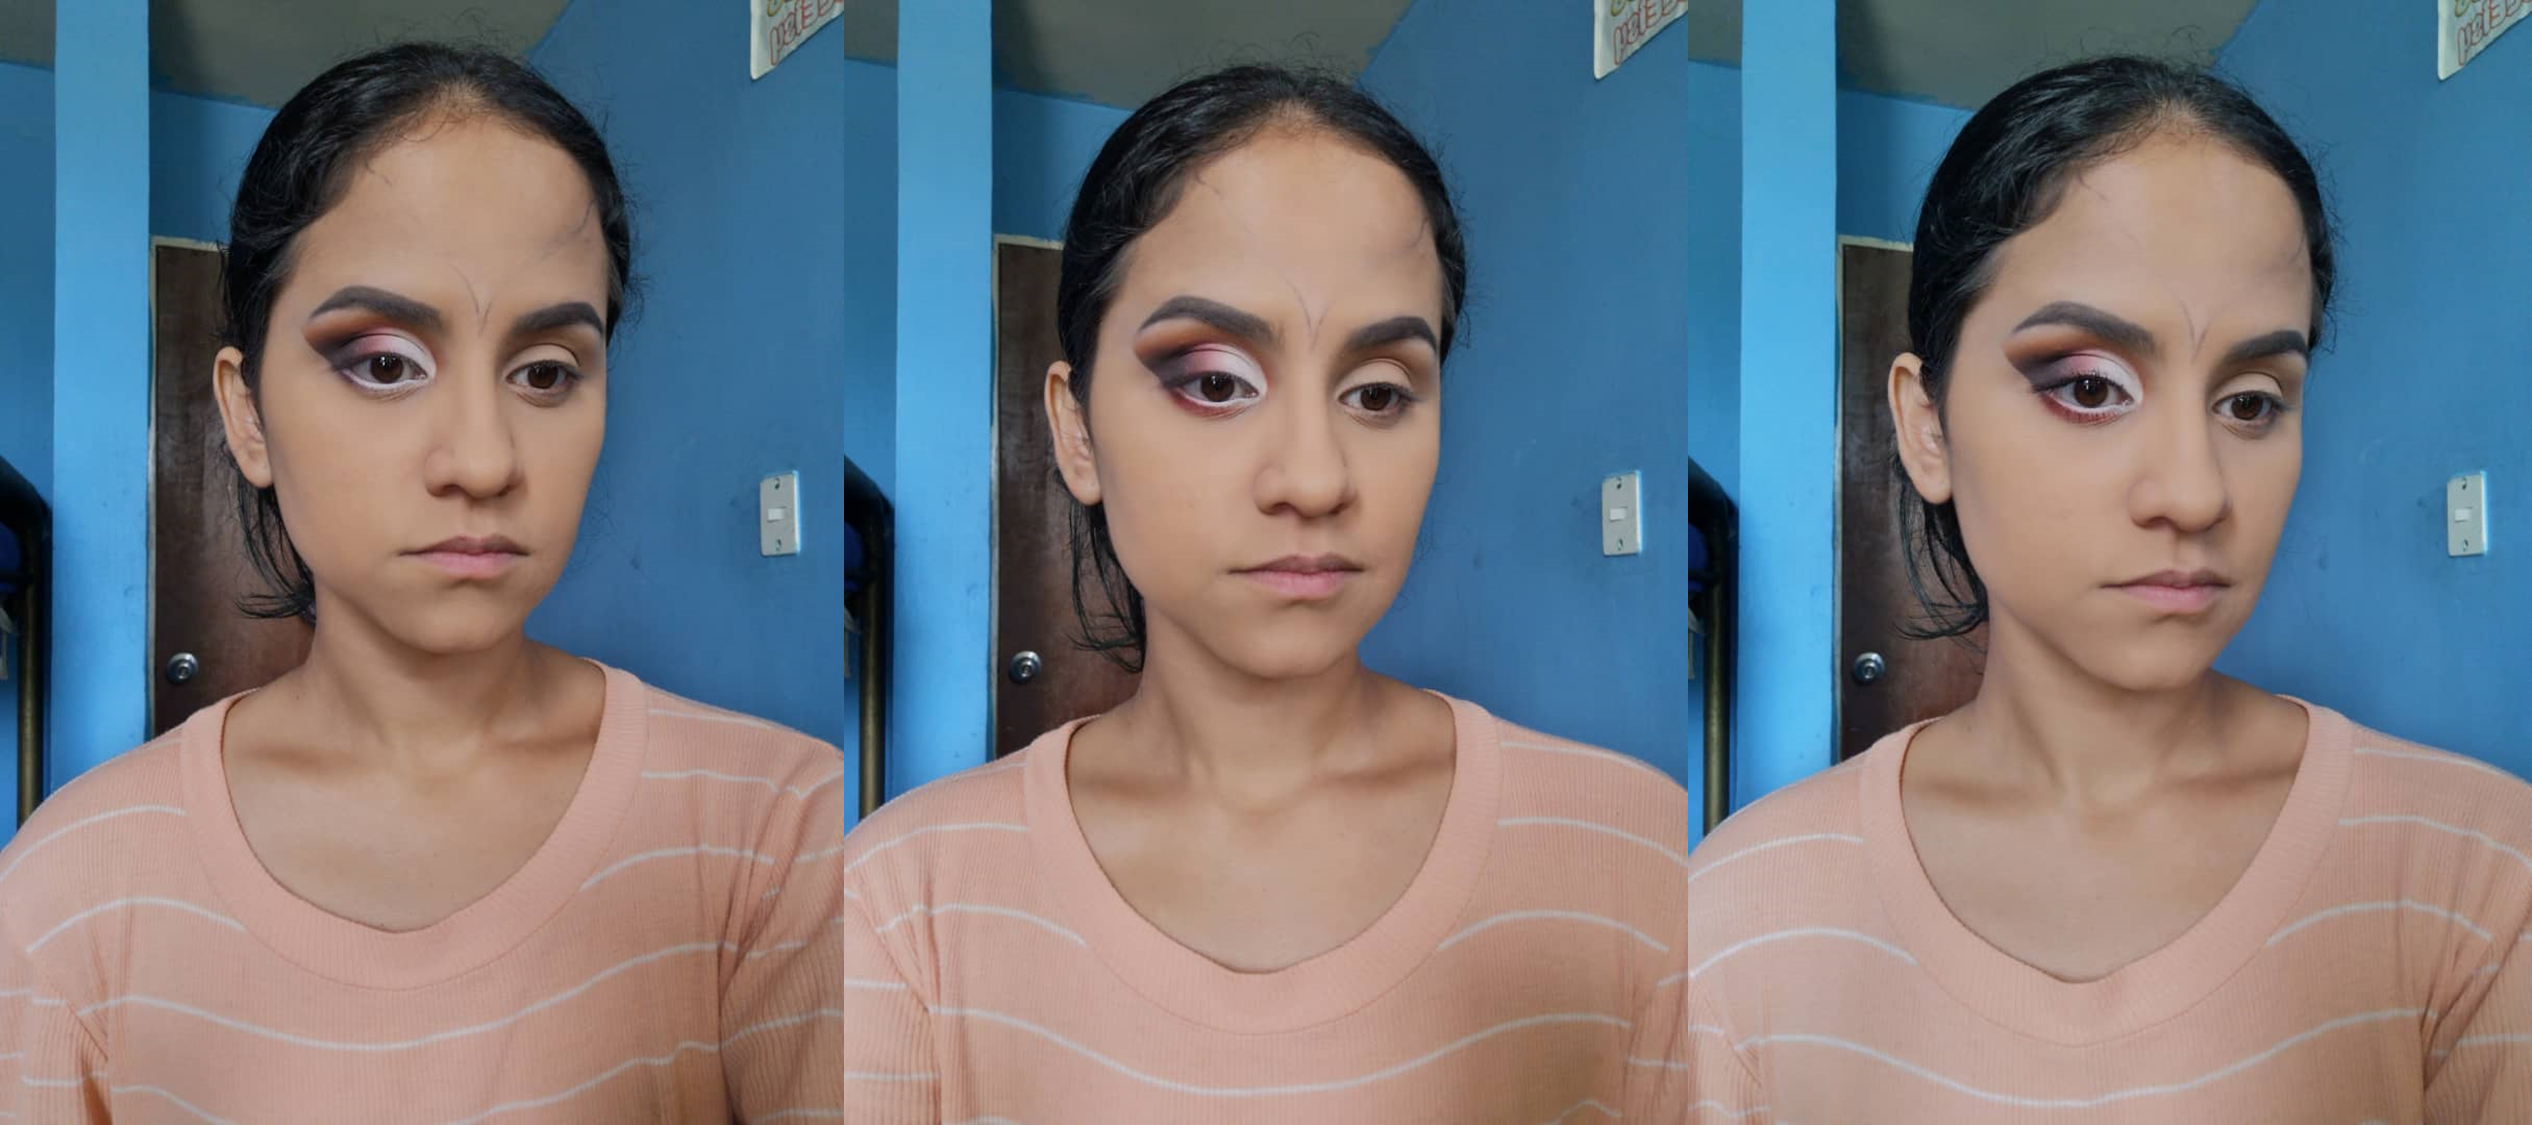
En el rostro, con un delineador negro realicé lo que seria los corte de la muñeca, las zonas que están apunto de romperse, que sería el triangulo en la zona de la frenta, el cual alargue hacia la nariz y, unas líneas en la zona de la boca hacia las orejas.
Con una sombra marrón oscura dí profundidad en los borde de las línea, para crear la ilusión de que se esta rompiendo y realicé varios círculos intercalando sombra negra y roja, que serán los huecos para nuestro hilo.
En la zona del cachete realicé con delineador negro e igualmente un poco de sombra roja, un corte.
On the face, with a black eyeliner I made what would be the cuts of the wrist, the areas that are about to break, which would be the triangle in the area of the forehead, which I lengthened towards the nose and some lines in the area of the mouth towards the ears.
With a dark brown shadow I gave depth on the edges of the lines, to create the illusion that it is breaking and I made several circles interspersed with black and red shadow, which will be the holes for our thread.
In the cheek area I made a cut with black eyeliner and some red shadow.
Para dar efecto de sangre, utilicé un labial brillo color rojo, y apliqué un poco en cada círculo que realicé, además del corte en el cachete.
Apliqué un labial rojo y por último con un poco de pega de pestaña, pegue un poco de algodón en la frente, cachete, boca y cuello.
To give the effect of blood, I used a red gloss lipstick, and applied a little on each circle I made, besides the cut on the cheek.
I applied a red lipstick and finally with some eyelash glue, I glued some cotton on the forehead, cheek, mouth and neck.
Por último, apliqué un poco más de sangre falsa en el algodón y con pega para pestañas pegue de poco a poco los pedazos de hilo.
Lastly, I applied a little more fake blood on the cotton and with eyelash glue, I glued the pieces of thread a little at a time.
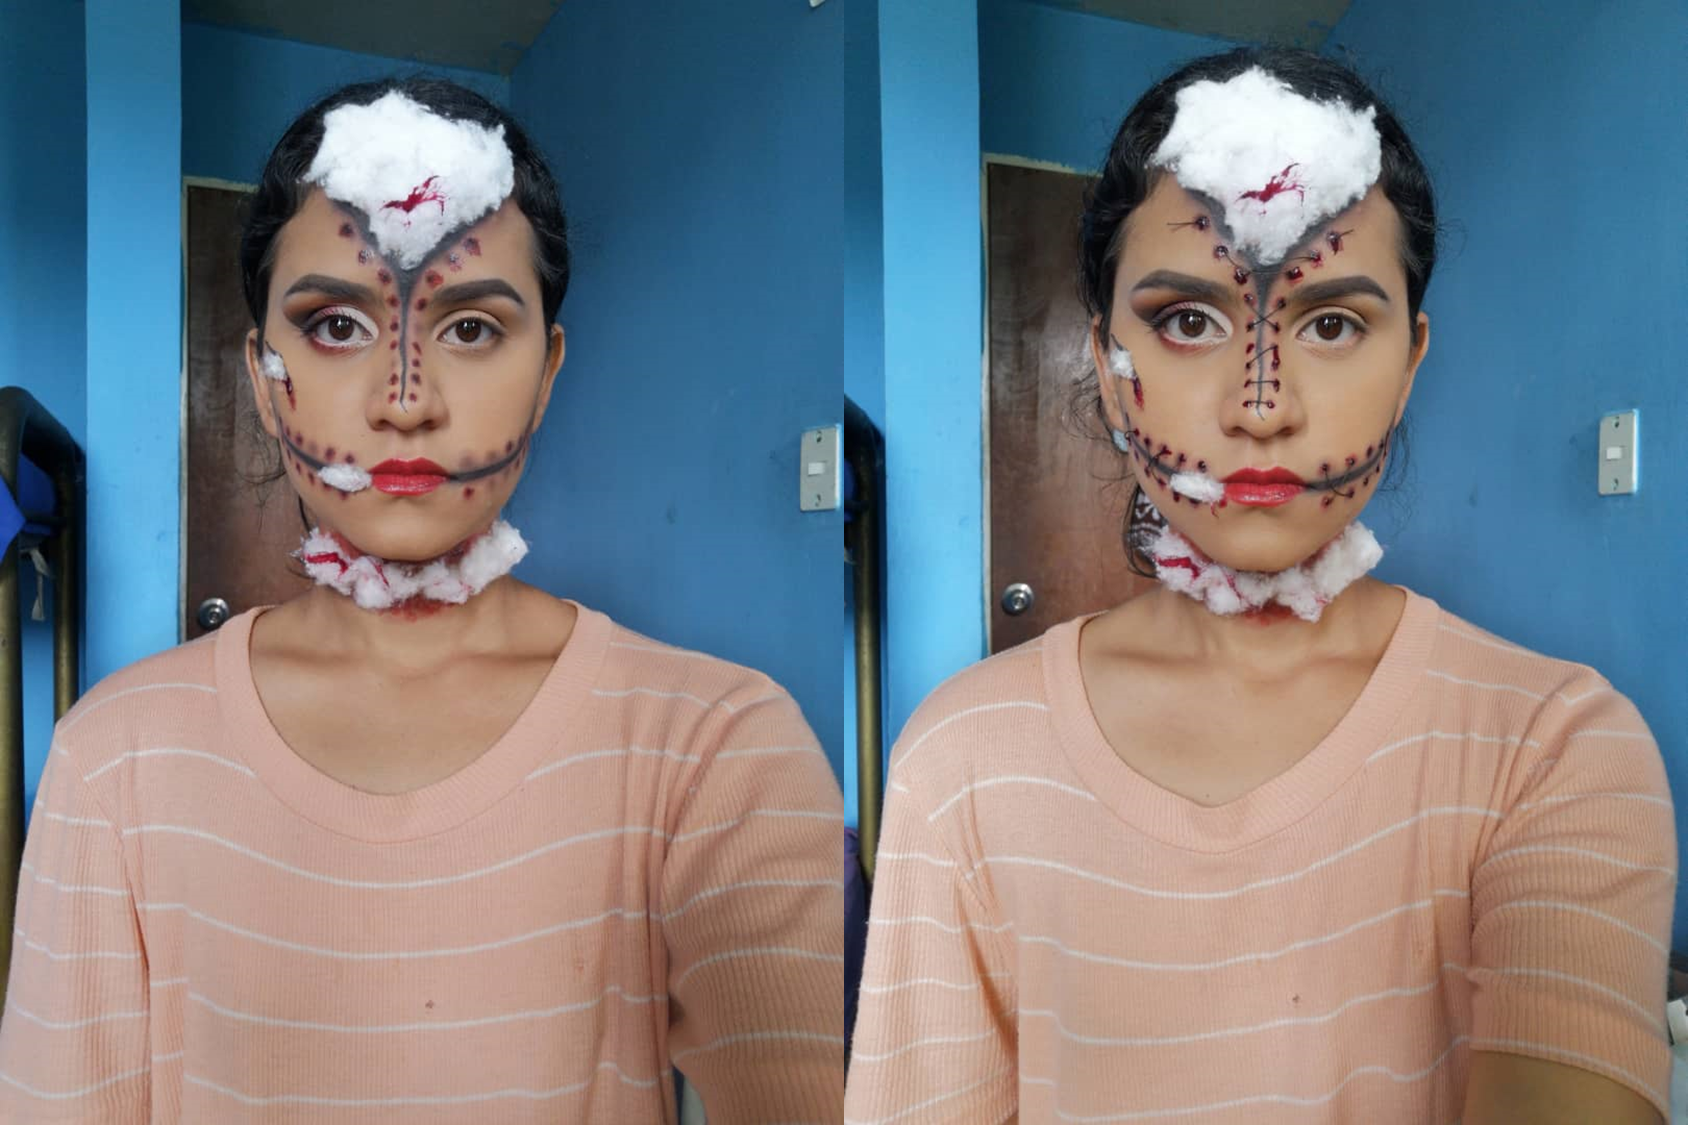
Este es todo el maquillaje de mi muñeca rota... En el ojo izquierdo, lo único que hice fue utilizar un poco de cinta adhesiva, le quite un poco la pega y la utilicé para que mi ojo no se abriera, sobre eso pegue con pega para pestañas un poco de algodón... Y listo.
Espero que les guste este maquillaje, sino me equivoco es la primera vez que hago un look de este estilo... Les mando un beso enorme y nos vemos en el siguiente post, que seguramente será un nuevo look de halloween.
This is all the makeup of my broken doll.... On the left eye, the only thing I did was to use some adhesive tape, I removed a little bit of the glue and used it so that my eye would not open, on that I glued with eyelash glue a little bit of cotton... And that's it.
I hope you like this makeup, if I'm not wrong this is the first time I do a look like this.... I send you a huge kiss and see you in the next post, which will surely be a new halloween look.
.jpeg)
Todas las fotos son de mi propiedad
All photos are my property
Gracias por visitar mi blog
Thank you for visiting my blog
Comments