USART Communication - Character String Introduction EN/ES
7 comments
Establishing a single bit control can be impractical in some environments where noise can cause signal disturbances and message errors, on the other hand serial communication is not limited to a single character as we could apply in previous article.
There are cases where it is convenient to handle more than one character not only to receive data in the microcontroller but also to send it. A more robust communications system will use a string of characters instead of one character because this will provide more secure communication.
We have already sent messages from the microcontroller in the form of strings but now we will learn how to create the code to receive this data and create control logic from it.
Establecer un control mediante un solo bit puede resultar algo poco práctico en algunos entornos donde el ruido puede causar perturbaciones en la señal y errores en el mensaje, por otro lado la comunicación serial no esta limitada a un solo carácter como pudimos aplicar en el artículo anterior.
Existen casos en los que es conveniente manejar más de un carácter no solo para recibir datos en el microcontrolador sino también para enviarlos. Un sistema de comunicaciones más sólido usará una cadena de caracteres en lugar de un carácter porque esto brindara una comunicación más segura.
Ya enviamos mensajes desde el microcontrolador en forma de cadenas pero ahora aprenderemos a crear el código para recibir estos datos y crear una lógica de control a partir de ellos.

New functions we will use |
|---|
A string consists of a group of characters grouped in a word, for this we must create a vector of type char in which the string will be stored, the size of the vector must be greater than the data that is expected to send or receive.
To facilitate the code we will use the get_string.c library in which are included the stdio.h and string.h libraries but also allow us to use the read_string functions by which we can read a string of characters instead of a single character and !strcmp(chain1, "chain2") which will allow us to compare two strings to take control actions based on the result.
Una cadena de caracteres consiste en un grupo de caracteres agrupados en una palabra, para ello debemos crear un vector del tipo char en el que se almacenará dicha cadena, el tamaño del vector debe ser superior al dato que se espera enviar o recibir.
Para facilitar el código usaremos la librería get_string.c en la cual están incluidas las librerias stdio.h y string.h pero ademas nos permitira usar las funciones read_string mediante la cual podemos leer una cadena de caracteres en lugar de un solo carácter y !strcmp(chain1, "chain2") la cual nos permitirá comparar dos cadenas para tomar acciones de control basadas en el resultado.
Programming |
|---|
In our initial configuration lines, apart from what we always configure, we must add the line #device PASS_STRINGS = IN_RAM that will allow us to pass the character strings to the RAM memory, in addition we create the vector chain[20].
En nuestras líneas de configuraciones iniciales a parte de lo que siempre configuramos deberemos añadir la linea #device PASS_STRINGS = IN_RAM que permitirá pasar las cadenas de caracteres a la memoria RAM, además creamos el vector chain[20].
#include <16f877a.h>

#device PASS_STRINGS = IN_RAM

#fuses HS,NOWDT,NOPROTECT,NOPUT,NOLVP,BROWNOUT

#use delay(clock=20M)

#use RS232(BAUD=9600, BITS=8, PARITY=N, XMIT=PIN_C6, RCV=PIN_C7)

#include <get_string.c>

#use standard_io(D)

#define LCD_DB4  PIN_D4

#define LCD_DB5  PIN_D5

#define LCD_DB6  PIN_D6

#define LCD_DB7  PIN_D7

#define LCD_RS   PIN_D2

#define LCD_E    PIN_D3

#include <LCD_20X4.c>

char chain[20];
We will use a motor and an LED connected to pins D_0 and D_1, so in the first lines we place the instructions so that these outputs are zeroed at startup to avoid an erroneous ignition. Then we start the LCD and write a welcome message on it, also we transmit this message by USART to the external device.
Usaremos un motor y un led conectados en los pines D_0 y D_1, por eso en las primeras líneas colocamos las instrucciones para que dichas salidas se hagan cero al inicio y evitar así un encendido erróneo. Luego iniciamos la LCD y escribimos un mensaje de bienvenida en ella, además transmitimos este mensaje por USART al dispositivo externo.
void main()

{

   output_low(PIN_D0);

   output_low(PIN_D1);

   lcd_init();

   delay_ms(900);

   lcd_clear();

   lcd_gotoxy(1,1);

   printf(lcd_putc,"WELCOME TO MY BLOG");

   lcd_gotoxy(1,2);

   printf(lcd_putc,"USART str reception");

   lcd_gotoxy(1,3);

   printf(lcd_putc,"@electronico - HIVE");

   lcd_gotoxy(1,4);

  printf(lcd_putc,"Original Content");

  printf("WELCOME TO MY BLOG\r\n");

  delay_ms(400);

  printf("USART str reception\r\n");

  delay_ms(400);

  printf("@electronico - HIVE\r\n");

  delay_ms(400);

  printf("Original Content\r\n");

  delay_ms(400);
Then in our while loop we will use the line if(kbhit() > 0), what we do with it is to establish a condition that will depend on the kbhit() function and is used to detect when a data has been received through the serial port, if the condition is true we use the function read_string(chain, 20); that will allow us to store the received string in the chain vector.
Luego en nuestro bucle while usaremos la línea if(kbhit() > 0), lo que hacemos con ella es establecer una condición que dependerá de la función kbhit() y sirve para detectar cuando se ha recibido un dato por el puerto serial, si la condición es cierta usamos la función read_string(chain, 20); que nos permitirá almacenar la cadena de caracteres recibida en el vector chain
    while(true)
   {

      if(kbhit() > 0)

      {

         read_string(chain, 20);
When a character string has been received it is stored in the chain vector from there we can use the !strcmp function that allows us to compare two character strings, we will use this function together with if conditionals to set 4 conditions:
motor_on will turn on the motor, display the message on the LCD and send the message to the external device to confirm that the data has been received and executed.
motor_off will turn the motor off, display the message on the LCD and send the message to the external device to confirm that the data has been received and executed.
led_on will turn the LED on, display the message on the LCD and send the message to the external device to confirm that the data has been received and executed.
led_off will turn off the LED, display the message on the LCD and send the message to the external device to confirm that the data has been received and executed.
Cuando se ha recibido una cadena de caracteres se almacena en el vector chain a partir de ahí podemos usar la función !strcmp que nos permite comparar dos cadenas de caracteres, usaremos dicha función junto a condicionales if para establecer 4 condiciones:
- motor_on encenderá el motor, mostrará el mensaje en el LCD y enviará el mensaje al dispositivo externo para confirmar que se ha recibido y ejecutado el dato.
- motor_off apagará el motor, mostrará el mensaje en el LCD y enviará el mensaje al dispositivo externo para confirmar que se ha recibido y ejecutado el dato.
- led_on encenderá el LED, mostrará el mensaje en el LCD y enviará el mensaje al dispositivo externo para confirmar que se ha recibido y ejecutado el dato.
- led_off apagará el LED, mostrará el mensaje en el LCD y enviará el mensaje al dispositivo externo para confirmar que se ha recibido y ejecutado el dato.
         if(!strcmp(chain, "motor_on"))

         {

            output_high(PIN_D1);

            printf("Motor: ON\r\n");

            lcd_clear();

            lcd_gotoxy(1,1);

            printf(lcd_putc,"USART str reception");

            lcd_gotoxy(1,2);

            printf(lcd_putc,"MOTOR: ON");

            lcd_gotoxy(1,3);

            printf(lcd_putc,"@electronico - HIVE");

            lcd_gotoxy(1,4);

            printf(lcd_putc,"Original Content");

            delay_ms(400);

         }

         else if(!strcmp(chain, "motor_off"))

         {

            output_low(PIN_D1);

            printf("Motor: OFF\r\n");

            lcd_clear();

            lcd_gotoxy(1,1);

            printf(lcd_putc,"USART str reception");

            lcd_gotoxy(1,2);

            printf(lcd_putc,"MOTOR: OFF");

            lcd_gotoxy(1,3);

            printf(lcd_putc,"@electronico - HIVE");

            lcd_gotoxy(1,4);

            printf(lcd_putc,"Original Content");

            delay_ms(400);

         }

         else if(!strcmp(chain, "led_on"))

         {

            output_high(PIN_D1);

            printf("LED: ON\r\n");

            lcd_clear();

            lcd_gotoxy(1,1);

            printf(lcd_putc,"USART str reception");

            lcd_gotoxy(1,2);

            printf(lcd_putc,"LED: ON");

            lcd_gotoxy(1,3);

            printf(lcd_putc,"@electronico - HIVE");

            lcd_gotoxy(1,4);

            printf(lcd_putc,"Original Content");

            delay_ms(400);

         }

         else if(!strcmp(chain, "led_off"))

         {

            output_low(PIN_D1);

            printf("LED:OFF\r\n");

            lcd_clear();

            lcd_gotoxy(1,1);

            printf(lcd_putc,"USART str reception");

            lcd_gotoxy(1,2);

            printf(lcd_putc,"LED: OFF");

            lcd_gotoxy(1,3);

            printf(lcd_putc,"@electronico - HIVE");

            lcd_gotoxy(1,4);

            printf(lcd_putc,"Original Content");

            delay_ms(400);

         }

      }

   }

}
It is important to note that we are no longer giving instructions using a single character but using character strings.
Es importante notar que ya no estamos dando instrucciones mediante un solo carácter sino que estamos usando cadenas de caracteres.
Simulation |
|---|
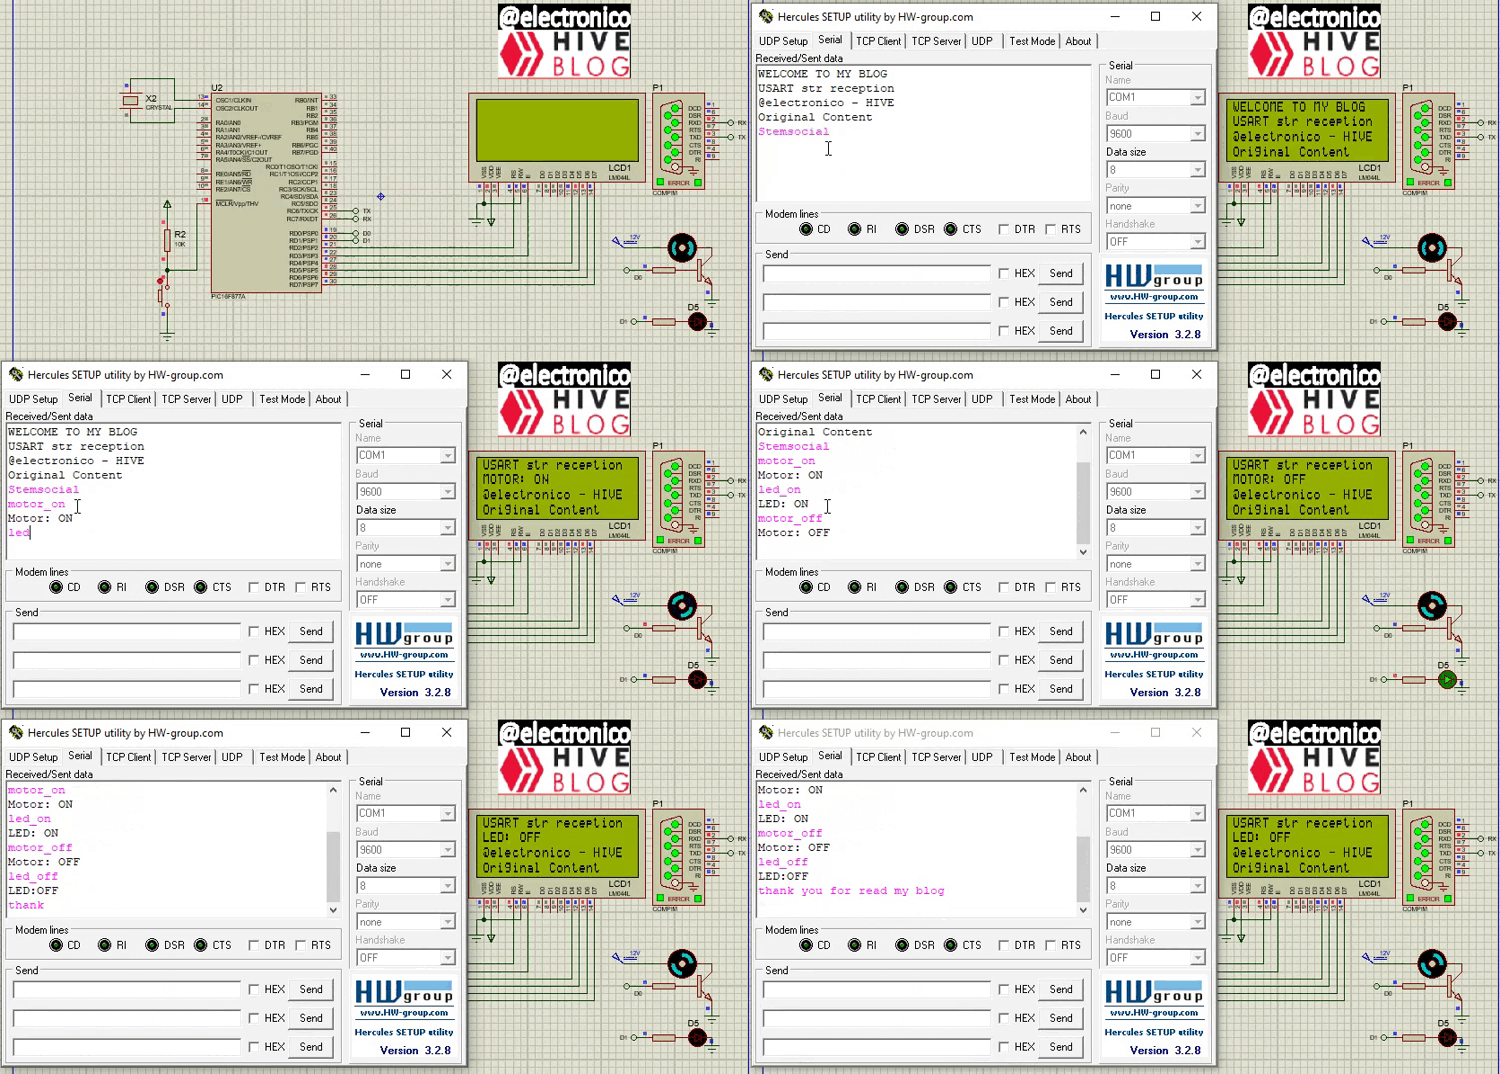
For our simulation we will initialize the microcontroller and we will see the welcome message, then we will try to send any character string in which case nothing should happen, then we will send motor_on to turn on the motor, then we turn on the led by sending led_on and then we turn off the motor with motor_off and the led with led_off.
Para nuestra simulación vamos a inicializar el microcontrolador y veremos el mensaje de bienvenida, luego intentaremos enviar una cadena de caracteres cualquiera en cuyo caso no debe ocurrir nada, luego enviaremos motor_on para encender el motor, luego encendemos el led enviando led_on y posteriormente apagamos el motor con motor_off y el led con led_off.
 ?format=webp&mode=fit


Comments