Driving an LCD with PIC16F877A EN/ES
6 comments
After having seen some theory about LCDs it is time to go into details about how to print text on LCDs using a microcontroller. For this we will use C language in the programming and we will simulate with proteus.
Luego de haber visto un poco de teoría sobre LCDs ha llegado el momento de entrar en detalles sobre cómo imprimir un texto en este tipo de pantallas usando un micro controlador. Para ello usaremos lenguaje C en la programación y simularemos con proteus.

Instructions |
|---|
In C language LCD handling does not require many lines, however for the case of our compiler we will add a library that will facilitate the task even more. You must define the connection pins between the microcontroller and the LCD, the LCD pins have fixed names, what is chosen is which pins of the microcontroller will connect each pin of the LCD which we do as follows:
En lenguaje C el manejo de LCD no requiere de muchas líneas, sin embargo para el caso de nuestro compilador añadiremos una librería que facilitará aún más la tarea. Se deben definir los pines de conexión entre el microcontrolador y la LCD, los pines de la LCD tienen nombres fijos, lo que se elige es a qué pines del microcontrolador se conectará cada pin de la LCD lo cual hacemos de la siguiente forma:
#define LCD_DB4   PIN_D4

#define LCD_DB5   PIN_D5

#define LCD_DB6   PIN_D6

#define LCD_DB7   PIN_D7

#define LCD_RS    PIN_D2

#define LCD_E     PIN_D3
The following instructions are used to handle the operation:
- lcd_init(); allows to initialize the LCD.
- lcd_gotoxy(x,y); places the pointer at the indicated position inside the parenthesis before starting the writing process.
- lcd_putc("text"); prints a text on the screen starting from the pointer position, remember the LCD limitations, i.e. do not print a text so large that it does not fit on the screen.
- lcd_clear(); Clears the screen, this action is necessary to write something new.
Para manejar la operación se usan las siguientes instrucciones:
- lcd_init(); permite inicializar la LCD.
- lcd_gotoxy(x,y); ubica el puntero en la posición indicada dentro del parentesis antes de iniciar la escritura.
- lcd_putc("text"); Imprime un texto en pantalla partiendo desde la posición del puntero, se debe recordar las limitaciones del LCD, es decir, no imprimir un texto tan grande que no entre en pantalla.
- lcd_clear(); Limpia la pantalla, esta acción es necesaria para escribir algo nuevo.
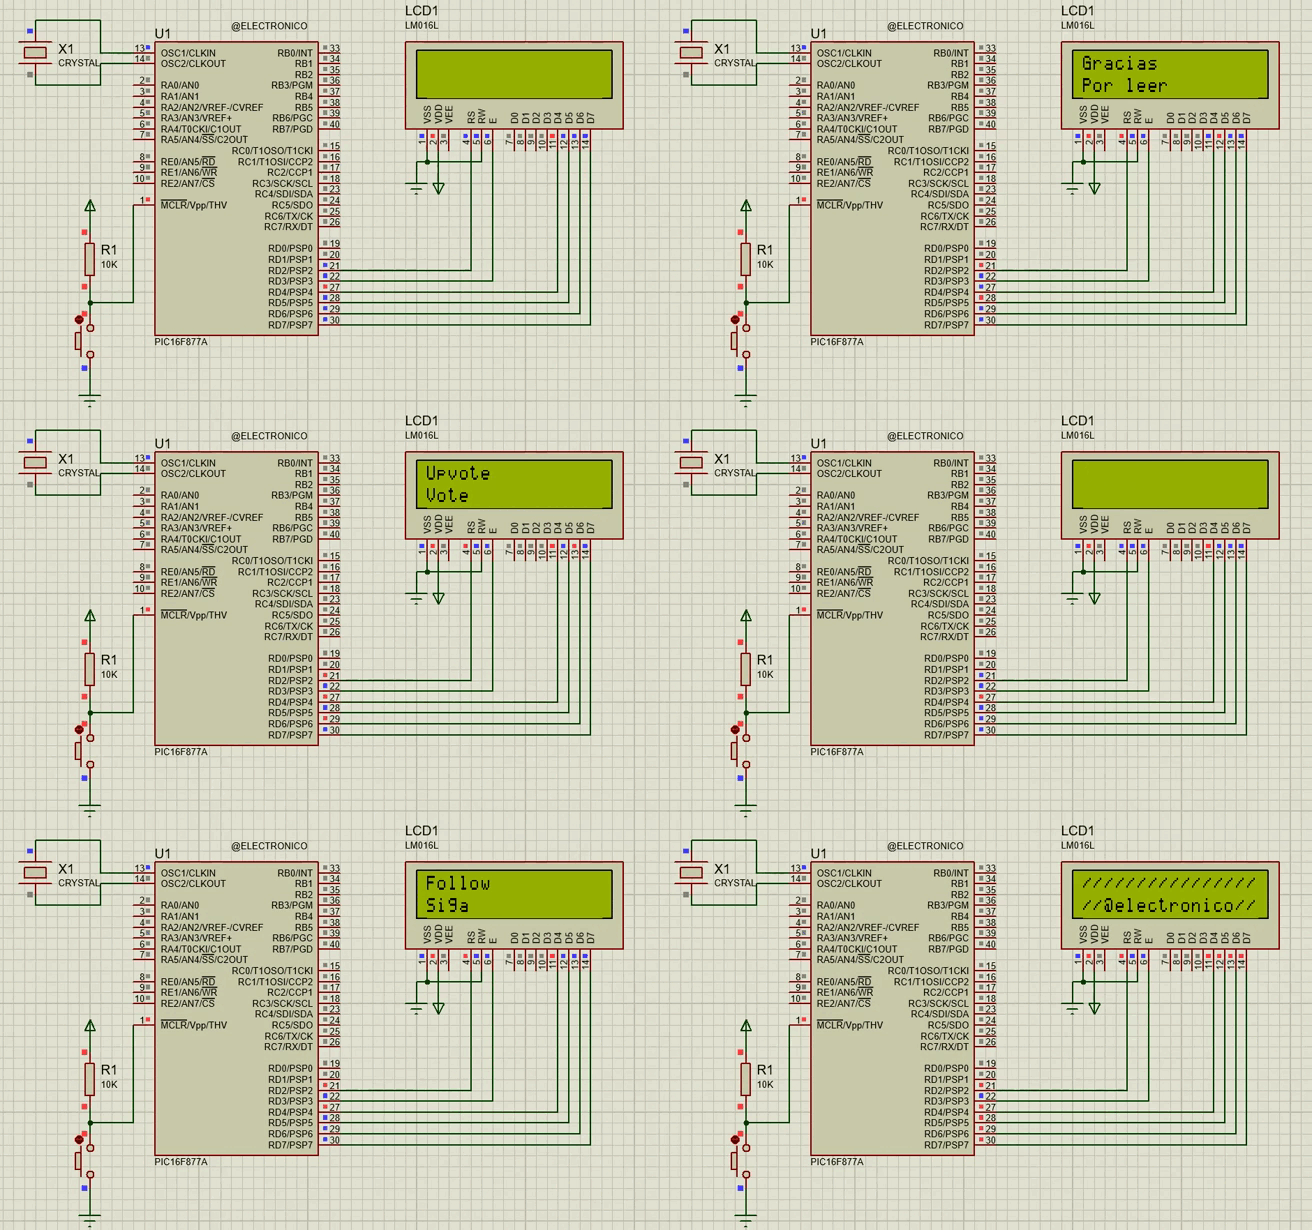
I have taken advantage of the explanation of the Matrix Display to shape a dynamic signature in my articles so now I will use the LCD as a complement, let's see how to print the text "Thanks for Reading" Vote, Comment, Reblog, follow me, @electronico. In the top row it will appear in English and in the bottom row in Spanish.
He aprovechado la explicación del Display matricial para dar forma a una firma dinámica en mis artículos así que ahora usaré el LCD como complemento, vamos a ver como imprimir el texto "Gracias por Leer" Vota, Comenta, Rebloguea, sigueme, @electronico. En la fila de arriba aparecerá en inglés y en la de abajo en español.
Programming |
|---|
We start by writing our header as usual in which we define our microcontroller, fuses, clock frequency and input/output handling function.
Iniciamos escribiendo nuestro encabezado como de costumbre en el cual definimos nuestro microcontrolador, fusibles, frecuencia del reloj y función para manejo de entradas/salidas.
#include <16f877a.h>

#fuses HS,NOWDT,NOPROTECT,NOPUT,NOLVP,BROWNOUT

#use delay(clock=20M)

#use standard_io(D)
Now we define on which pins of the microcontroller the LCD pins will be connected and in the last line we add the LCD library.
Ahora definimos en qué pines del microcontrolador se conectarán los pines de la LCD y en la última línea agregamos la librería de la LCD.
#define LCD_DB4   PIN_D4

#define LCD_DB5   PIN_D5

#define LCD_DB6   PIN_D6

#define LCD_DB7   PIN_D7

#define LCD_RS    PIN_D2

#define LCD_E     PIN_D3

#include <LCD_16X2.c
Next we will initialize our LCD in the main program with the instruction already described and then create an infinitely repeating while loop in which we will write the instructions that will allow us to display the text.
We place the pointer in (1,1) to write in the top row and in (1,2) to write in the bottom row, then we set a delay (delay_ms) that determines how long we want to display that text, finally we clear the screen and print the next text doing this until we print all of them.
Lo siguiente será inicializar nuestra LCD en el programa principal con la instrucción ya descrita y luego crear un bucle while de repetición infinita en el cual escribiremos las instrucciónes que nos permitirán mostrar el texto.
Ubicamos el puntero en (1,1) para escribir en la fila de arriba y en (1,2) para escribir en la fila de abajo, luego se establece un retardo (delay_ms) que determina durante cuanto tiempo queremos mostrar ese texto, finalmente se limpia la pantalla y se imprime el siguiente texto haciendo esto hasta imprimir todos.
void main()
{

  lcd_init();

  while(true)

  {

    lcd_gotoxy(1,1);

    lcd_putc("Thank you");

    lcd_gotoxy(1,2);

    lcd_putc("For read");

    delay_ms(700);

    lcd_clear();

    delay_ms(200);

    lcd_gotoxy(1,1);

    lcd_putc("Gracias");

    lcd_gotoxy(1,2);

    lcd_putc("Por leer");

    delay_ms(700);

    lcd_clear();

    delay_ms(200);

    lcd_putc("Upvote");

    lcd_gotoxy(1,2);

    lcd_putc("Vote");

    delay_ms(700);

    lcd_clear();

    delay_ms(200);

    lcd_putc("Comment");

    lcd_gotoxy(1,2);

    lcd_putc("comente");

    delay_ms(700);

    lcd_clear();

    delay_ms(200);

    lcd_putc("Reblog");

    lcd_gotoxy(1,2);

    lcd_putc("Rebloguee");

    delay_ms(700);

    lcd_clear();

    delay_ms(200);

    lcd_putc("Follow");

    lcd_gotoxy(1,2);

    lcd_putc("Siga");

    delay_ms(700);

    lcd_clear();

    delay_ms(200);

    lcd_putc("////////////////");

    lcd_gotoxy(1,2);

    lcd_putc("//@electronico//");

    delay_ms(700);

    lcd_clear();

    delay_ms(200);

  }
}
With all the code already defined, it only remains to compile and test in our proteus simulator.
Con todo el código ya definido solo queda compilar y probar en nuestro simulador proteus.


Comments