Controlling an analog variable with PIC16F877A EN/ES
8 comments
With all the content we have seen so far we are already able to create our first automatic control system, we already know how to handle discrete and analog inputs that can come from different types of sensors that will have some of these two natures and we know how to handle discrete outputs.
We will use everything seen above to create a generalized system in which an analog variable is read and try to control by a discrete output, for our example we will use the charge level of a capacitor but this principle can be applied to many processes.
Con todo el contenido que hemos visto hasta ahora ya estamos en capacidad de crear nuestro primer sistema de control automático, ya sabemos como manejar entradas discretas y analógicas que pueden provenir de los distintos tipos de sensores que tendrán alguna de estas dos naturalezas y sabemos cómo manejar las salidas discretas.
Usaremos todo lo visto anteriormente para crear un sistema generalizado en el que se lee una variable analógica y se intenta controlar mediante una salida discreta, para nuestro ejemplo usaremos el nivel de carga de un capacitor pero este principio se puede aplicar a muchos procesos.
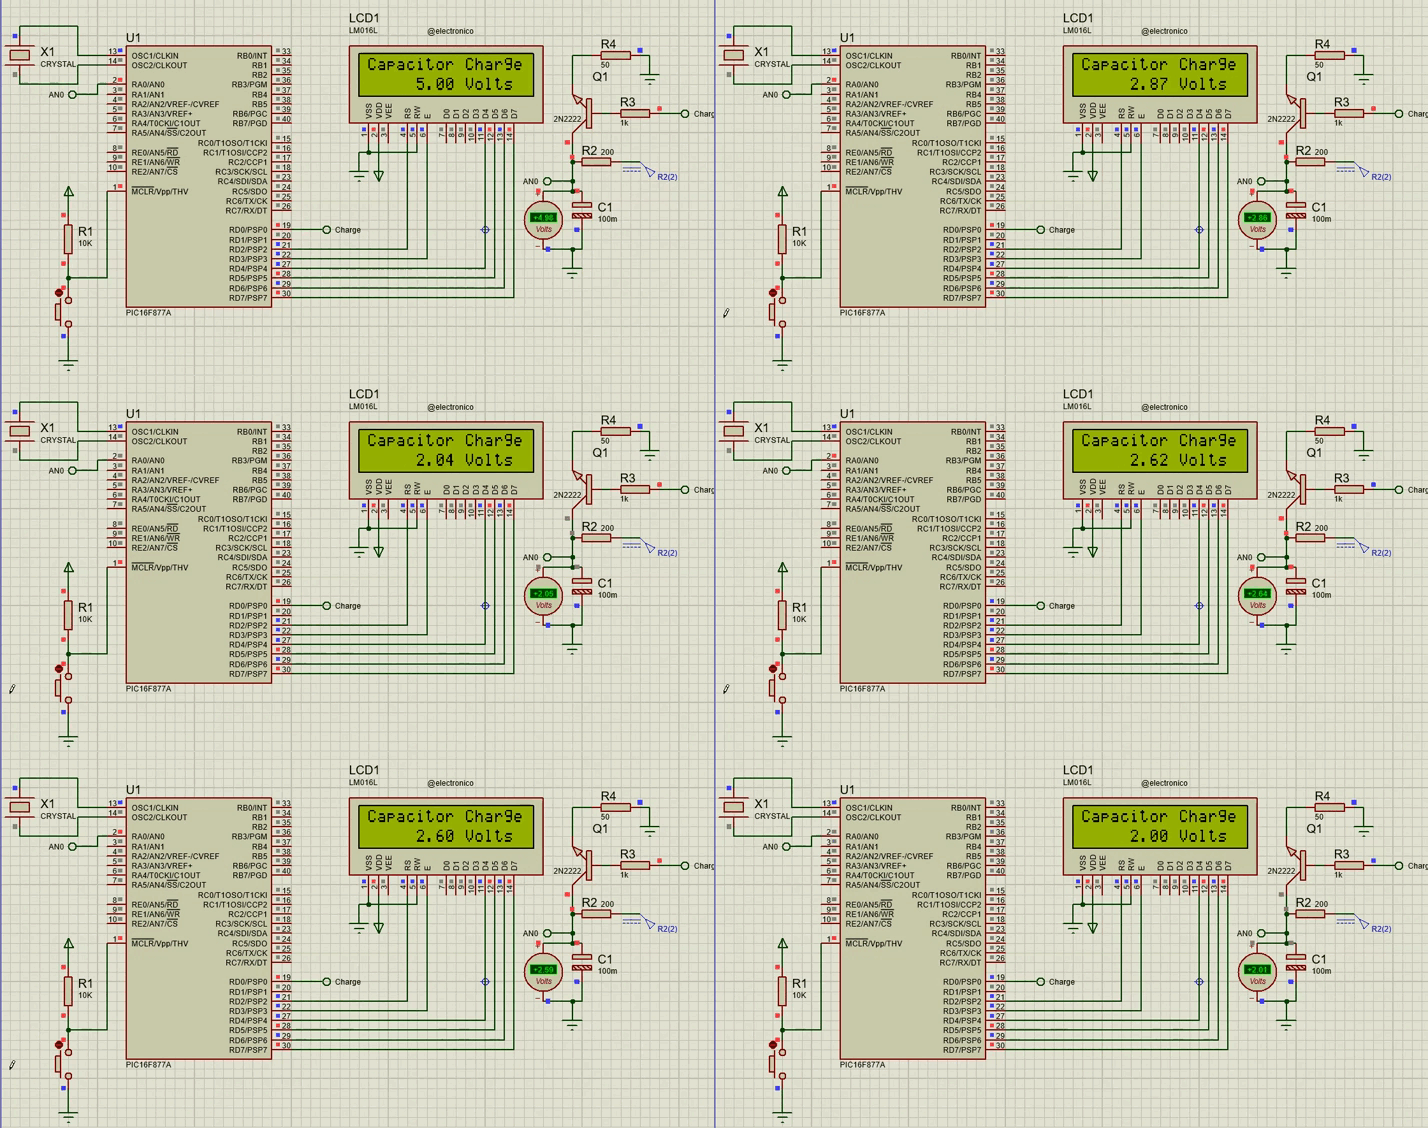
 Electronic circuit designed in Proteus for the simulation. src: @electronico
 The control of a variable is to maintain its value in a certain range, when we want to establish such control the first thing we must establish is what is the minimum value to which we can accept that the variable reaches and what is the maximum, these two points are known as range and are the values within which the variable will be maintained whenever it is controlled, if we want to maintain a pressure between 10PSI and 100PSI the range will be 10-100PSI, the variable should never be below the minimum or above the maximum.
The difference between the maximum and minimum value is known as SPAN and represents the magnitude of variation that exists between the minimum and maximum, for the case of the previous paragraph the SPAN is 90PSI. Abrupt changes are not desired in many physical variables, so establishing a control that touches the minimum and maximum values in a very short time is not recommended.
El control de una variable consiste en mantener su valor en un rango determinado, cuando deseamos establecer dicho control lo primero que debemos establecer es cual es el mínimo valor al que podemos aceptar que llegue dicha variable y cual el máximo, estos dos puntos se conocen como rango y son los valores dentro de los cuales se mantendrá la variable siempre que sea controlada, si deseamos mantener una presión entre 10PSI y 100PSI el rango será de 10-100PSI, la variable nunca deberá estar por debajo del mínimo ni por encima del máximo.
La diferencia entre el valor máximo y el mínimo se conoce como SPAN y representa la magnitud de variación que existe entre el mínimo y el máximo, para el caso del parrafo anterior el SPAN es de 90PSI. Los cambios bruscos no son deseados en muchas variables físicas por lo que establecer un control que toque los valores mínimos y máximos en un tiempo muy corto no es recomendable.
In a control system the controller must be monitoring the variable at all times through the sensors and must contain the code that activates / deactivates the outputs to modify the variable when necessary, this output signal sent by the controller must be able to reach an actuator which is the one that directly influences the variable.
Now let's consider the following circuit by which we will control the capacitor charge levels.
En un sistema de control el controlador debe estar monitoreando la variable en todo momento mediante los sensores y debe contener el código que active/desactive las salidas para modificar dicha varable cuando sea necesario, esta señal de salida que envía el controlador debe ser capáz de llegar a un actuador que es el que influye de forma directa sobre la variable.
Ahora vamos a considerar el siguiente circuito mediante el cual controlaremos los niveles de carga en capacitor.

Charging/discharging circuit. Src: @electronico
Our attention should be focused on what happens with C1 which is the capacitor in which we want to have a controlled voltage, initially the source R2(2) which is 5V will charge the capacitor to 5V, as the voltage levels are between 0 and 5V we can use the ADC of the microcontroller itself as a sensor, so we place that connection to AN0.
While there is no voltage at the base of the transistor Q1 the capacitor will remain at 5V, but if a voltage appears at the Charge point the transistor switches, this causes the capacitor to discharge through the resistor R4 reaching 0V. To control the voltage levels the Charge point is a connection to the output of the microcontroller so that it can take control of the switching of the transistor, thus our transistor becomes an actuator since it is who has the ability to modify the variable.
What we will do will be to create a control system that allows to maintain the capacitor load in a range of 2-3Volts, the load should never go below 2Volts and should never go above 3Volts, in addition we will show in a 16x2 LCD the voltage values in the capacitor, for which our microcontroller will work as Voltmeter and I have placed a software voltmeter to compare the value measured by it with the value measured by our program.
Nuestra atención debe centrarse en lo que ocurre con C1 que es el capacitor en el que deseamos tener un voltaje controlado, inicialmente la fuente R2(2) que es de 5V cargará al capacitor a 5V, como los niveles de voltaje están entre 0 y 5V podemos usar el propio ADC del microcontrolador como sensor, por eso colocamos esa conexión a AN0.
Mientras no exista voltaje en la base del transistor Q1 el capacitor se mantendrá a 5V, pero si aparece un Voltaje en el punto Charge el transistor conmuta, esto hace que el capacitor se descargue mediante la resistencia R4 llegando a 0V. Para controlar los niveles de voltaje el punto Charge es una conexión a la salida del microcontrolador para que éste pueda tomar el control de la conmutación del transistor, de esta forma nuestro transistor se convierte en un actuador ya que es quien tiene capacidad de modificar la variable.
Lo que haremos será crear un sistema de control que permita mantener la carga del capacitor en un rango de 2-3Volts, la carga nunca debe bajar de 2Volts y nunca debe subir de 3Volts, además mostraremos en un LCD 16x2 los valores de voltaje en el capacitor, para lo cual nuestro microcontrolador funcionará como Voltimetro y he colocado un voltimetro del software para comparar el valor medido por éste con el valor medido por nuestro programa.
Programming |
|---|
The first lines are similar to those of our article Using ADC in PIC16F877a EN/ES but now we will add the variable charge by which we will process the "raw value" to display it as a function of voltage, this way we will see the value of the variable measured in Volts at all times.
Las primeras líneas son similares a las de nuestro artículo Using ADC in PIC16F877a EN/ES pero ahora añadiremos la variable charge mediante la cual procesaremos el "valor crudo" para mostrarlo en función del voltaje, de esta forma miraremos el valor de la variable medido en Volts en todo momento.
#include <16f877a.h>

#device ADC = 10

#fuses HS,NOWDT,NOPROTECT,NOPUT,NOLVP,BROWNOUT

#use delay(clock=20M)

#use standard_io(D)

#define LCD_DB4   PIN_D4

#define LCD_DB5   PIN_D5

#define LCD_DB6   PIN_D6

#define LCD_DB7   PIN_D7

#define LCD_RS    PIN_D2

#define LCD_E     PIN_D3

#include <LCD_16X2.c

long raw_value;

float charge;

void main()

{

   lcd_init();

   setup_adc_ports(AN0);

   setup_adc(adc_clock_internal);


   while(true)

   {

      set_adc_channel(0);

      delay_us(20);

      raw_value = read_adc();
To display the value of our variable instead of the raw value we must process it with the formula Value= (Vref*raw_value)/1023.0; Vref is the maximum value that our variable can reach, raw_value is the raw measurement of our variable in real time, remember that it goes from 0 to 1023 and the divisor is the maximum value that the 10-bit ADC can reach. Once this line is written we proceed to display the value on the screen.
Para que se muestre el valor de nuestra variable en lugar del valor crudo debemos procesarlo con la formula Value= (Vref*raw_value)/1023.0; Vref es el valor máximo que puede alcanzar nuestra variable, raw_value es la medición cruda de nuestra variable en tiempo real, recordemos que va de 0 a 1023 y el divisor es el valor máximo al que puede llegar el ADC de 10 Bits. Una vez escrita esta línea procedemos a mostrar el valor en la pantalla.
     float charge = (5.0*raw_value)/1023.0;

      lcd_clear();

      lcd_gotoxy(1,1);

      lcd_putc("Capacitor Charge");

      lcd_gotoxy(6,2);

      printf(lcd_putc,"%0.2f Volts", Charge);

      lcd_gotoxy(11,2);

      delay_ms(150);
After the analog signal has been processed the process becomes simpler, we set two if conditions, one for when the value is equal or greater than 3V in which case we activate the RD0 output connected to the base of transistor Q1, this will cause the voltage on the capacitor to decrease, but if it is equal or less than 2V the RD0 output is deactivated causing the transistor to switch and the capacitor to recharge.
Después que se ha procesado la señal analógica el proceso se vuelve más sencillo, establecemos dos condiciones if, una para cuando el valor sea igual o mayor a 3V en cuyo caso activamos la salida RD0 conectada a la base del transistor Q1, esto hará que el voltaje en el capacitor disminuya, pero si es igual o menor a 2V se desactiva la salida RD0 haciendo que el transistor conmute y el capacitor se vuelva a cargar.
if(charge >= 3)

      {

      output_high(PIN_D0);

      }


      else if (charge <= 2)

      {

      output_low(PIN_D0);

      }

   }

}
Now it is time to see our simulation, I would like to take the opportunity to observe the margin of error of 4.8mV that I mentioned in the previous article and that is linked to the resolution of the ADC. We will notice that the maximum value goes up a little more than 3 before going down and down a little more than 2 before going up, this happens because of this.
Ahora llego el momento de ver nuestra simulación, quisiera que aprovechemos de observar el margen de error de 4.8mV que mencionaba en el artículo anterior y que está ligado a la resolución del ADC. Notaremos que el valor máximo sube un poco más de 3 antes de bajar y baja un poco más de 2 antes de subir, esto ocurre por esta causa.


Comments