Controlling a RGB LED with PWM on PIC16F877A EN/ES
5 comments
Taking advantage that we have fresh the topic of PWM we will see in this article how to control an RGB LED, I will assume that the reader has zero knowledge on the subject as I have not written about this type of component in the past so there will be a theoretical section in this article to explain what is an RGB LED and its principle of operation in which we will learn to use PWM for control.
Finally we will design a control circuit using the PIC16F877A microcontroller and simulate the color generation by creating a program in C language using the PIC C Compiler software.
Aprovechando que tenemos fresco el tema de PWM vamos a ver en este artículo cómo controlar un LED RGB, supondré que el lector tiene cero conocimiento en el tema ya que no he escrito sobre este tipo de componente en el pasado así que habrá un apartado teórico en este artículo para explicar lo que es un LED RGB y su principio de funcionamiento en el cual aprenderemos a usar PWM para su control.
Finalmente diseñaremos un circuito de control usando el microcontrolador PIC16F877A y simularemos la generación de colores creando un programa en lenguaje C usando el software PIC C Compiler.

Circuit to be simulated created by @electronico
Concept and operating principle |
|---|
An RGB LED consists of an arrangement of 3 LEDs in one in order to make it shine in the full range of colors, for this a red LED, a green LED and a blue LED are implemented, combining the intensity of brightness separately can show a lot of colors.
For this, the RGB LED has 4 pins, 3 for each color and one for the common one that can be anode or cathode. If you want the red color only the PIN R is energized, if the green then only the G and for the blue only the B.
To make this clear we will illustrate it with a circuit in which we will use pushbuttons to turn on each color independently.
Un LED RGB consiste en un arreglo de 3 LEDs en uno con la finalidad de poder hacerlo brillar en toda la gama de colores, para esto se implementan un LED rojo, uno verde y uno azul, combinando la intensidad de brillo por separado se pueden mostrar una gran cantidad de colores.
Para ello el LED RGB cuenta con 4 pines, 3 para cada color y uno para el común que puede ser anodo o catodo. Si se quiere el color rojo solo se energiza el PIN R, si el verde entonces solo el G y para el azul solo el B.
Para que esto se pueda notar de forma clara lo vamos a ilustrar con un circuito en el que usaremos pulsadores para encender cada color de forma independiente.

Mixing RGB colors |
|---|
In a very interesting way these colors can be mixed to generate new colors as if it were liquid paint, the electronic process by which this is achieved is by varying the currents of each color. The color that we want to dull we make it receive less current and thus that LED will present less brightness and the one we want to highlight we make it receive more current.
If we can precisely control the proportion in which each LED will provide a degree of brightness to form a color we can reach a wide range of colors in a controlled manner, in the following image we see a possibility combining the RGB colors with their maximum brightness.
De una forma muy interesante estos colores se pueden mezclar para generar nuevos colores como si de pintura líquida se tratase, el proceso electrónico por el que esto se logra es variando las corrientes de cada color. El color que queramos opacar hacemos que reciba menos corriente y de esa forma ese LED presentará menos brillo y el que queramos resaltar hacemos que reciba más corriente.
Si logramos controlar con precisión la proporción en la que cada LED aportará un grado de brillo para formar un color podremos llegar a una gran gama de colores de forma controlada, en la siguiente imagen vemos una posibilidad combinando los colores RGB con su máximo brillo.
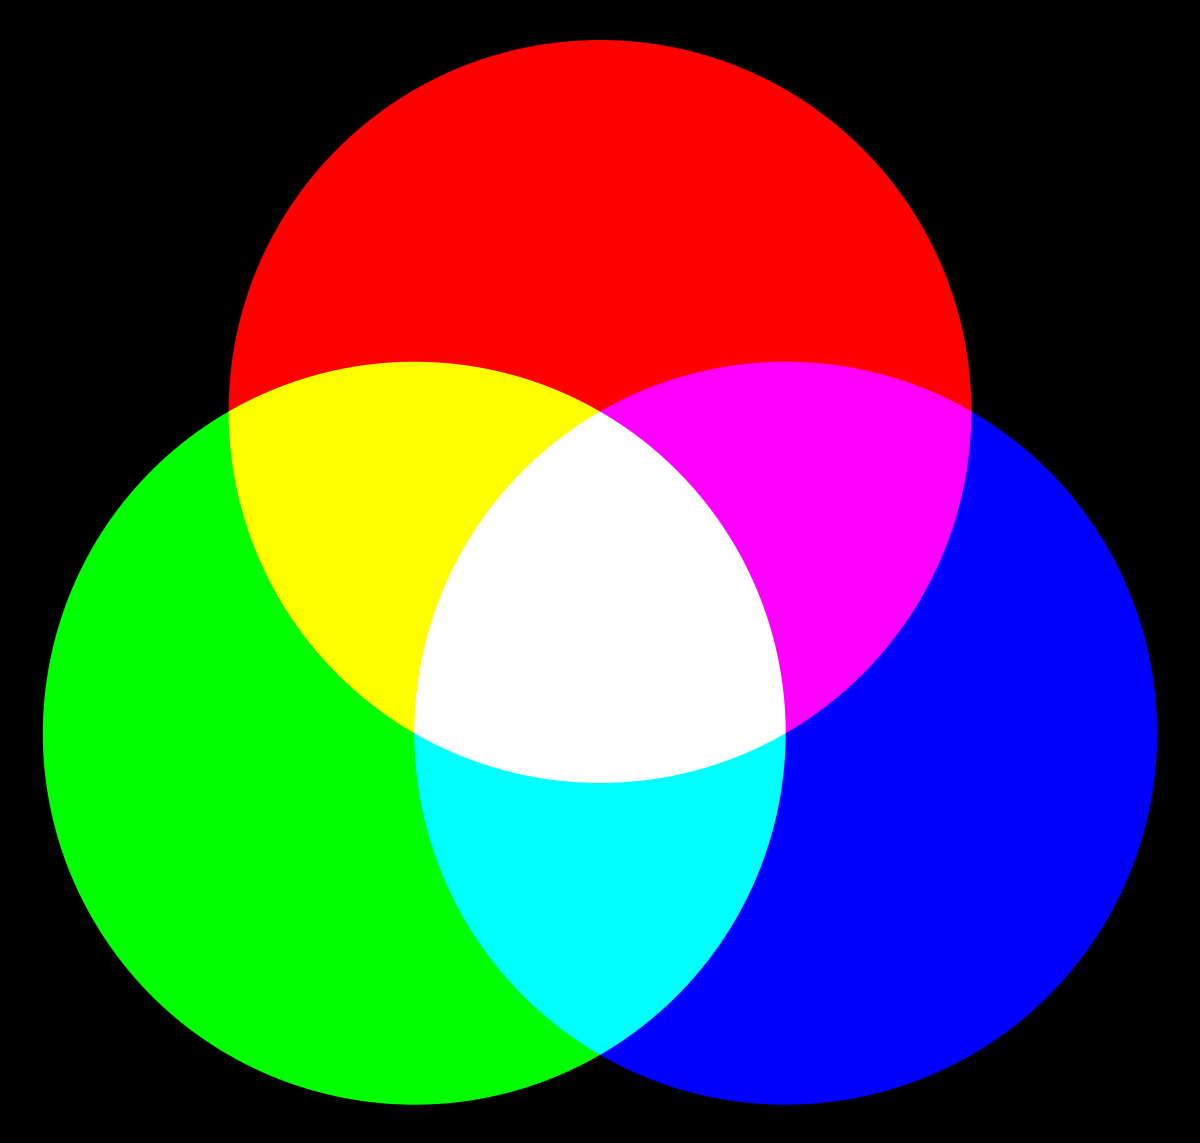
Additive color mixing with RGB colors. Author:Quark67. Src, License: Creative Commons 3.0
But if instead of using the maximum brightness to make the combinations we start creating combinations by varying the brightness of each LED the number of colors that can be obtained increases drastically. So we can play that we are artists in the area of painting and start creating the colors we are most passionate about.... well... actually it is not about that, the main application of this type of LED is to combine with others to form images, yes, just like the ones you currently see on your screen.
For a final illustration of combinations let's look at another range of possible combinations using RGB.
Pero si en lugar de usar el máximo brillo para hacer las combinaciones comenzamos a crear combinaciones variando el brillo de cada LED el numero de colores que se pueden obtener aumenta drásticamente. Así que podemos jugar a que somos artistas en el área de la pintura y comenzar a crear los colores que mas nos apasionen... bueno... en realidad no se trata de eso, la aplicación principal de este tipo de led es combinarse con otros para formar imágenes, si, tal como las que miras actualmente en tu pantalla.
Para una ilustración final de combinaciones miremos otra gama de posibles combinaciones usando RGB.
5-degree color wheel with RGB pixels of the colors. Author: László Németh. Src, License: CC0.
Precise colors with electronic techniques |
|---|
One way to achieve a wide variation of colors would be to use potentiometers, however the color mixing would be inaccurate and the potentiometer itself would consume extra power that would be dissipated as heat (unused).
That's why it is more practical to use a more controlled method, besides this type of LEDs are used to represent pixels in monitors that carry thousands and millions of them. Can you imagine controlling so many by force of potentiometers?
Luckily for us we have learned to use PWM recently 😉. If we do a little memory recall the articles that are still fresh in which we said that one of the main applications of PWM was the brightness control of a lamp, this makes it perfect for controlling the brightness of an LED and thus control an RGB LED, plus since in the microcontroller we can place a precise PWM output for a duty cycle of 0 to 100% with a resolution of 8bits the odds are in our favor. So let's do it!!! 😄.
Una forma de lograr una amplia variación de colores sería usando potenciómetros, sin embargo la mezcla de colores sería poco precisa y el potenciómetro en si consumiría energía extra que se disipará en forma de calor (no aprovechada).
Por eso es más práctico usar un método más controlado, además este tipo de LEDs es usado para representar pixeles en monitores que llevan miles y millones de ellos. Imaginas controlar tantos a fuerza de potenciómetros?
Por suerte para nosotros hemos aprendido a usar PWM recientemente 😉. Si hacemos un poco de memoria recordaremos los articulos que aun estan frescos en los que dijimos que una de las principales aplicaciones de PWM era el control de brillo de una lampara, esto lo hace perfecto para controlar el brillo de un LED y por ende controlar un LED RGB, ademas dado que en el microcontrolador podemos colocar una salida precisa en PWM para un ciclo de trabajo de 0 a 100% con una resolucion de 8bits las probabilidades nos favorecen. Así que vamos a hacerlo!! 😄.
Programming |
|---|
To create our program we need to generate 3 PWM signals (one for each color) and if we remember the PIC16F877A only has two CCP modules, but there is a library called RGB_Control.c that we can use and it will allow us to generate the 3 signals, we just have to assign them the Connect pins to each color using the #define led_(r, g or b) PIN_pin directive and to write a value to the output we will use color(r, g or b)_channel_write(value, COMMON_ANODE);
We also need to initialize the RGB function with rgb_init(); , the configuration part of our program would look like this:
Para crear nuestro programa necesitamos generar 3 señales PWM (una para cada color) y si recordamos el PIC16F877A solo dispone de dos módulos CCP, pero existe una librería llamada RGB_Control.c que podemos usar y nos permitirá generar las 3 señales, solo debemos asignarles los Pines de conexión a cada color usando la directiva #define led_(r, g o b) PIN_pin y para escribir un valor en la salida usaremos color(r, g o b)_channel_write(value, COMMON_ANODE);
También debemos inicializar la función RGB con rgb_init(); , la parte de configuración de nuestro programa quedaría de la siguiente forma:
#include <16f877a.h>

#fuses HS,NOWDT,NOPROTECT,NOPUT,NOLVP,BROWNOUT

#use delay(clock=20M)

#use standard_io(B)

#define led_r PIN_B5

#define led_g PIN_B6

#define led_b PIN_B7

#include <RGB_Control.c

int time = 1;

void main()

{

rgb_init();

rgb_write_value(0, 0, 0, COMMON_ANODE);
Now what we want to do is not to show a color or two, but all... yes, all 😎... for this we will use different for loops to progressively modify the values of each PWM channel from 0 to 255 and this will produce the different possible combinations.
The code shown is a repetitive code that seeks to vary each channel and combine them.
Ahora lo que queremos hacer no es mostrar un color o dos, sino todos... si, todos 😎... para ello lo que haremos será usar diferentes bucles for para ir modificando progresivamente los valores de cada canal PWM de 0 a 255 y esto irá produciendo las diferentes combinaciones posibles.
El código que se muestra es un código repetitivo que lo que busca es eso, variar cada canal y combinarlo.
   while(true)

   {

      for(int i=0; i<255; i++)

      {

         red_channel_write(i, COMMON_ANODE);

         delay_ms(time);

         red_channel_write(i, COMMON_ANODE);

         delay_ms(6);

      }


      for(int j=0; j<255; j++)

      {

         blue_channel_write(j, COMMON_ANODE);

         delay_ms(time);

         blue_channel_write(j, COMMON_ANODE);

         delay_ms(6);

      }


      for(int k=255; k>0; k--)

      {

         red_channel_write(k, COMMON_ANODE);

         delay_ms(time);

         blue_channel_write(k, COMMON_ANODE);

         delay_ms(6);

      }


      for(int l=0; l<255; l++)

      {

         green_channel_write(l, COMMON_ANODE);

         delay_ms(time);

         green_channel_write(l, COMMON_ANODE);

         delay_ms(6);

      }


      for(int m=255; m>0; m--)

      {

         blue_channel_write(m, COMMON_ANODE);

         delay_ms(time);

         green_channel_write(m, COMMON_ANODE);

         delay_ms(6);

      }


      for(int n=0; n<255; n++)

      {

         red_channel_write(n, COMMON_ANODE);

         delay_ms(time);

         red_channel_write(n, COMMON_ANODE);

         delay_ms(6);

      }


      for(int p=255; p>0; p--)

      {

         green_channel_write(p, COMMON_ANODE);

         delay_ms(time);

      }

      for(int q=0; q<255; q++)

      {

         blue_channel_write(q, COMMON_ANODE);

         green_channel_write(q, COMMON_ANODE);

         delay_ms(time);

         red_channel_write(q, COMMON_ANODE);

         blue_channel_write(q, COMMON_ANODE);

         green_channel_write(q, COMMON_ANODE);

         delay_ms(6);

      }


      for(int r=255; r>0; r--)

      {

         red_channel_write(r, COMMON_ANODE);

         blue_channel_write(r, COMMON_ANODE);

         green_channel_write(r, COMMON_ANODE);

         delay_ms(time);

      }

   }

}
Simulation |
|---|
For our simulation we will appreciate the effect caused by the different combinations that although they will happen very fast (there are so many that if we give a second of time to each one we will spend all night watching, so I assigned short times) will allow us to appreciate the variation of colors, also we will use the oscilloscope to monitor the variation in the 3 PWM signals.
Para nuestra simulación vamos a apreciar el efecto que causan las distintas combinaciones que aunque sucederán muy rápido (son tantas que si le damos un segundo de tiempo a cada una pasáremos toda la noche observando, así que les asigne tiempos cortos) nos permitirán apreciar la variación de colores, además usaremos el osciloscopio para monitorear la variación en las 3 señales PWM.

 ?format=webp&mode=fit


Comments